Thursday, December 19, 2013

Noel Card

 
After working so hard to get my Christmas cards done, I realized I was a few short, which somehow seems to happen every year for me! On the plus side, I got to use some of my scraps from the CTMH Sparkle and Shine and take part in the Seize the Sketch challenge and the Heart 2 Heart Sparkle and Shine challenge.
 
 
I love the simplicity of the sketch, which made the card so easy to make. I love the banner embellishments that came with the Sparkle and Shine dimensional elements and I've been wanting to use them, so this was perfect for me.


The Celebrate the Season sentiment is cut from the strip on the Sparkle and Shine paper.


Saturday, December 7, 2013

December Deal!

For the month of December, the FIRST person to place an order over $50 with me will receive the Scandinavian Wishes stamp set FREE! This offer is good only for the month of December and available only through me, so order now!
 
And, don't forget, with a $50 purchase, you qualify for the December Stamp of the Month for only $5!


Sparkle and Shine Starburst cards

 
I have been wanting to try the starburst/sunburst technique for a while now, and finally tried it! These cards are so simple to make and it's easy to make multiples, which is great for this time of year trying to get a truckload of holiday cards made! I was surprised how simple this technique is and I made all four of these in approximately 30 minutes.


I used the CTMH Sparkle and Shine paper and embellishments for all of these cards along with red shimmer trim.
 
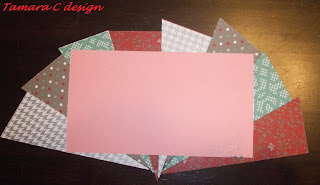
I like to use four different patterns, but you can use more or less, whatever suits you. These instructions will make one card, so if you are making them in bulk, just cut more and it will be easy to streamline the process.
 
First, cut four strips of patterned paper 1 1/2"x4".
 
 
Next, cut the strips from corner to corner, creating triangles.
 
 
Cut a scrap to 5"x2 3/4". You can use any color, it shouldn't show through. Mark the middle, at 2 1/2".


Add adhesive to the scrap piece and place your triangle strips, starting in the middle, making sure you cover the corners of the scrap piece.


I like to make sure the order is the same but if it isn't, that's okay too!


Once placed, cut around the scrap piece, making a starburst rectangle.

 
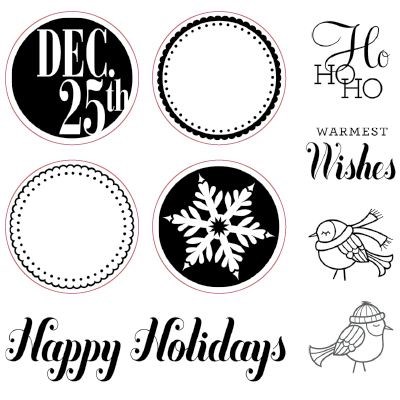
On this particular card, I placed it on Juniper card stock, adhered to my card then trimmed with shimmer trim and an embellishment after stamping the sentiment with the Perfect Fit Holiday stamp set.


These cards are so simple to make! You can bet this is my design for the season!
 
TFL and get those cards made, Christmas will be here before you know it!


For the month of December, the FIRST person to place an order over $50 with me will receive the Scandinavian Wishes stamp set FREE! This offer is good only for the month of December and available only through me, so order now!


Thursday, December 5, 2013

Mixed Media art

I have been noticing a new trend with mixed media artwork lately and I have to say I've been intrigued. I don't always like it, but that's the way art is, I suppose. Mixed media is just that, using more than one type of media on your project. I love to paint, scrapbook, stamp...anything creative, I usually enjoy it. I stumbled upon a couple of Facebook groups and it got me inspired to try it out. I had all of the supplies I needed so I just went for it.


I think it turned out pretty well, not too bad for my first attempt! Most supplies were from my stash. I did use the CTMH Paisley Perfect stamp set for the paisley and "Perfect 10".
 
TFL!


Sunday, December 1, 2013

Minion Ornaments

 
Well, things have been busy around here with the holidays now upon us. I just wish I could stay home and craft every day! No such luck, but I was able to finally whip up these cute little guys. My sister in law and her family love these characters, and I couldn't find any so I decided I would figure it out and make them.


I have had the plastic ornaments in my stash for a while now, not knowing what to actaully do with them.
 
 
The top comes off with a little pull, then just add a bit of acrylic paint and shake it to cover. They had some bubbles at first, but they went away after a few minutes.  I let them sit out for a couple of days to dry out, rolling them a couple of times a day to keep them evenly covered.


I found different sized google eyes, silver pipe cleaners and black glitter tape. I decided after this photo to use fake eyelashes for the hair, which was perfect! (Actually, that was my husband's idea, and a good one. I wish I could take credit for that!)

 
It was a process to figure out how to attach everything, but once I got the glue situation handled, they came together nicely. 
 
I wanted to get them done, and I wasn't confident in my painting abilities, so we printed out the smiles on photo paper, fussy cut them and adhered them. (Also my husband's idea, thank you dear!)


I love how these turned out and my SIL loved them, so mission accomplished!
 
 Happy Holidays, TFL!


Saturday, November 23, 2013

One Big Hockey Family

 
I made this LO for the Heart 2 Heart Game On Challenge. The photo is of my brother and his family.


All items are from my stash. The arrows were stamped using CTMH Artbooking collection, then heat embossed.
 
TFL!

Monday, November 18, 2013

Always Grateful

This week I took part in the Cardabilities Sketch Challenge #87 as well as the Color My Heart Color Dare #69.
 
 
The Color My Heart Color Dare was to use CTMH Smokey Plum, Gold Rush and Olive, perfect colors for fall, which means I can do another fall card before we are bombarded by the winter holidays!


I had to use Gypsy in place of the Smokey Plum, since I don't have it in my stash yet and I also substituted Goldrush with Autumn Terracotta. I The background stamps for the flags were from my stash as well as the lower leaf. The circle leaf 'button' is CMTH Petite Perks.
 
TFL!


Friday, November 15, 2013

Heart 2 Heart and Inspired By #96 Challenges

Can you believe it's getting to be that time of year again? The holidays are coming upon us fast! I've been putting off Christmas/Holiday cards as long as I could, trying to enjoy everything about fall, but that time is here, I can no longer deny it! I do love the holidays though and I'm glad it's time to enjoy it.
 
My first holiday card I've made this year was inspired by two different challenges, the Heart 2 Heart Seeing Double Challenge and the Inspired By Challenge based on this photo...
 
 
I love the trees and the different textures!


I used the Close To My Heart Sparkle and Shine paper and Dimensional elements. I am loving this paper and can't wait to create more with it. TFL, have a creative day!
 

Monday, November 11, 2013

Christmas Treat Cards

 
Recently, I had a home gathering and my hostess took an Idea Book with her to work to share with her co-workers. After looking at the Idea Book, one of her fellow employees decided she liked the card featured on page 79.
 
 
She did not, however, want to actually make the card! She was a very sweet woman, who wants to give handmade gifts, without having to actually do the work herself! Lucky for me, she asked me to make them for her and I got my first commissioned job! It was a pleasure to make them for her and I love how they turned out!


I used Colonial white for the card, stamped the snowflakes and sentiment using A Perfect Fit-Holiday stamp set.
 
Inks used are Desert Sand, Juniper and Ruby. Cardstock trim was made using chocolate, juniper and topped with Red Shimmer trim. I used pink Glitter Gems as an added embellishment, since the darker shades look red. I am going to add a piece of backing for her to attach after adding the candy of her choice.
 
Thanks for looking and feel free to contact me if you are interested in ordering supplies, or hand made items!


Sunday, November 10, 2013

Base and Bling

I wanted to share these creations from my mother-in-law and my sister-in-law made with the CTMH Base and Bling.
 
My mother-in-law made these necklaces.


I love her layering technique with the metal accents and jewels.
 
My sister-in-law made these headbands using the Base and Bling headband, jewels, floral accents and larger flowers she got at the craft store. I love these!

 
Thank you for sharing these and allowing me to post!

Friday, November 8, 2013

New Picture My Life program from Close To My Heart!

An exciting new line is coming from Close To My Heart! It's the Picture My Life Program, which makes documenting your memories easy as 1-2-3!
 
 
If you sign up to be a CTMH consultant between November 1st and December 15th, you can earn one of these sets for free!


How does this work? You simply slip the cards into the sleeves along with your photos, and you have a completed album! It's simple, fast and no fuss!
 
Contact me for more information on how to earn this great new product for FREE!


Tuesday, November 5, 2013

Wedding Card

 
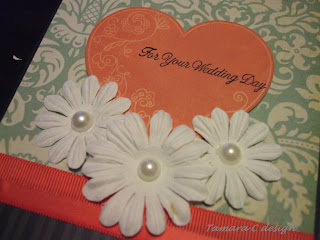
I made this card for a co-worker who recently got married. I just happened to stumble across the Creatalicious challenge looking for wedding themed cards, so I lucked out! It's not traditional, but I love the colors and how it turned out!


The paper is Fancy Pants from my stash, as well as the pearls, flowers and ribbon. The heart is Close To My Heart, Irresistibles inked with sorbet; the sentiment is black pigment ink from CTMH.
 
TFL!